Recycling! (part 2): build your new website with Flask (and Twitter Bootstrap) and run it on Openshift
Let's put Flask, Twitter Bootstrap and OpenShift together to build our new super cool website in 30 minutes.
Posted August 02th, 2012 in openshift, flask, bootstrap
Previously we discussed about what technologies we will use to build our new website. The winners are Flask, OpenShift and Twitter Bootstrap.
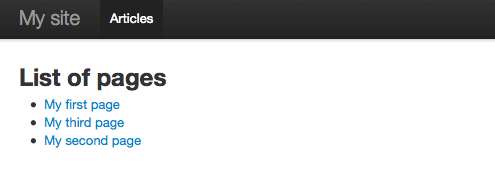
Now we will see how to put all together to obtain something like in the following screenshot.
TL,DR
If you want to see the results before digging in the how-to, point your browser at http://mysite-riccardoforina.rhcloud.com
If you are not confortable with the topics, I suggest you to follow this how-to step by step. I have tested it copy-pasting every line of code, so you'll end with something working for sure.
Anyway, you can find the latest version of the code presented in this how-to on github.
Step 1: configure OpenShift
First, we'll need an OpenShift account, so register for free if you still haven't got one. After that you can follow the first 2 steps of the getting started with OpenShift page.
Be careful with the domain name selection, keep in mind it will be part of every app you'll deploy, like this:
[appname]-[domainname].rhcloud.com
So for me my domainname is riccardoforina and the appname for this website is notes.
From here I'll assume you have a working CLI and your domain name is foobar. Let's create our website!
$ mkdir foobar.rhcloud.com
$ cd foobar.rhcloud.com
$ rhc app create -a mysite -t python-2.6
We made a container for all our apps, we cd inside it and we told OpenShift to create a new app named mysite of type python-2.6. The operation is a bit long with a lot of output, you should end with a directory tree like this:
foobar
└── mysite
    ├── .git
    ├── .openshift
    │   ├── action_hooks
    │   ├── cron
    │   └── markers
    ├── data
    ├── libs
    └── wsgi
        └── static
You'll find some README files trough the directories. Read them! They'll help you understand better the layout of your app.
In short, how all this works?
Everything is based on GIT. You make some changes, push them on the GIT repository OpenShift provides you and by doing so you trigger these actions:
- the code is pulled on the server from yout GIT repository
- a new virtualenv for your app is installed
- the setup.py file is run to configure your app and fetch the dependencies you specified, if any
- the hooks in .openshift/action_hooks are executed, if any
- the app is online
Step 2: create our Flask app
OpenShift uses virtualenv to install your dependencies. That's a great idea and we will do the same (and I suggest you doing it every time you work on a python based project).
The example application (/wsgi/application) refers to a virtualenv named virtenv in the $APPDIR directory. We'll create it this way:
$ cd mysite
$ virtualenv virtenv
$ source virtenv/bin/activate
$ export APPDIR=/Users/myuser/foobar.rhcloud.com/mysite/
I usually put my virtualenv in .gitignore, so I don't mess around when working on different clients.
$ echo "/virtenv" >> .gitignore
Now that our virtualenv is configured and active, we can install Flask and Flask-FlatPages. I'll use pip to do it.
$ pip install Flask Flask-FlatPages
Let's update the setup.py file to reflect our virtualenv. Edit it so that it will look like this:
from setuptools import setup

setup(name='YourAppName',
      version='1.0',
      description='OpenShift App',
      author='Your Name',
      author_email='example@example.com',
      url='http://www.python.org/sigs/distutils-sig/',
      install_requires=[
        'Flask',
        'Flask-FlatPages'
      ],
     )
Now we have to create our Flask website. We'll do it by editing the /wsgi/application file so that it will look like this:
#!/usr/bin/python
import os

virtenv = os.environ['APPDIR'] + '/virtenv/'
os.environ['PYTHON_EGG_CACHE'] = os.path.join(virtenv, 'lib/python2.6/site-packages')
virtualenv = os.path.join(virtenv, 'bin/activate_this.py')
try:
    execfile(virtualenv, dict(__file__=virtualenv))
except IOError:
    pass
#
# IMPORTANT: Put any additional includes below this line.  If placed above this
# line, it's possible required libraries won't be in your searchable path
#

from flask import Flask, render_template
from flask_flatpages import FlatPages

DEBUG = True
FLATPAGES_AUTO_RELOAD = DEBUG
FLATPAGES_EXTENSION = '.md'

application = Flask(__name__)
application.config.from_object(__name__)
pages = FlatPages(application)


@application.route('/')
def index():
    return render_template('index.html', pages=pages)


@application.route('/<path:path>/')
def page(path):
    page = pages.get_or_404(path)
    return render_template('page.html', page=page)

#
# Below for testing only
#
if __name__ == '__main__':
    application.run(port=8000)
Great, now you can run your app locally like this:
$ python wsgi/application
Note: you can stop the web server with CTRL-C. Usually I create 2 shells, one with the web server running and one to do things. It's up to you!
This will start a web server on localhost on port 8000. Point your browser on http://127.0.0.1:8000 and… you'll get an error! Flask will complain with a TemplateNotFound: index.html exception. It's a good thing, it means we have all correctly installed and configured.
We can finally start building our website!
Step 3: create our website
We need some templates to start with. We will use Twitter Bootstrap, so we will have to do some extra coding.
$ cd wsgi
$ mkdir templates
$ cd templates
We need 3 files: base.html, index.html, page.html
base.html
This will be the base template used by every page.
<!DOCTYPE html>
<html lang="en">
<head>
    <meta charset="utf-8">
    <title>mysite-foobar.rhcloud.com</title>
    <meta name="viewport" content="width=device-width, initial-scale=1.0">
    <meta name="description" content="">
    <meta name="author" content="">

    <!-- Le styles -->
    <link href="{{ url_for('static', filename="bootstrap/css/bootstrap.min.css") }}" rel="stylesheet">
    <link href="{{ url_for('static', filename="bootstrap/css/bootstrap-responsive.min.css") }}" rel="stylesheet">
    <style>
      body {
        padding-top: 60px; /* 60px to make the container go all the way to the bottom of the topbar */
      }
    </style>

    <!-- Le HTML5 shim, for IE6-8 support of HTML5 elements -->
    <!--[if lt IE 9]>
    <script src="http://html5shim.googlecode.com/svn/trunk/html5.js"></script>
    <![endif]-->

</head>

<body>

    <div class="navbar navbar-fixed-top">
        <div class="navbar-inner">
            <div class="container">
                <a class="btn btn-navbar" data-toggle="collapse" data-target=".nav-collapse">
                    <span class="icon-bar"></span>
                    <span class="icon-bar"></span>
                    <span class="icon-bar"></span>
                </a>
                <a class="brand" href="{{ url_for('index')}}">My site</a>
                <div class="nav-collapse">
                    <ul class="nav">
                        <li class="active"><a href="{{ url_for('index')}}">Articles</a></li>
                    </ul>
                </div><!--/.nav-collapse -->
            </div>
        </div>
    </div>

    <div class="container">

        <div class="row">
            <div class="span12">
                {% block content %}
                {% endblock content %}
            </div>
        </div>

    </div> <!-- /container -->

<!-- Le javascript
    ================================================== -->
    <!-- Placed at the end of the document so the pages load faster -->
    <script src="https://ajax.googleapis.com/ajax/libs/jquery/1.7.2/jquery.min.js"></script>
    <script src="{{ url_for('static', filename="bootstrap/js/bootstrap.min.js") }}"></script>
</body>
</html>
index.html
This will list all the available pages.
{% extends "base.html" %}

{% block content %}
    <h2>List of pages</h2>
    <ul>
    {% for page in pages %}
        <li>
            <a href="{{ url_for("page", path=page.path) }}">{{ page.title }}</a>
        </li>
    {% else %}
        <li>No pages.</li>
    {% endfor %}
    </ul>
{% endblock content %}
page.html
This will print the content of our page.
{% extends "base.html" %}

{% block content %}
    <h2>{{ page.title }}</h2>
    {{ page.html|safe }}
{% endblock content %}
static
Download the latest Twitter Bootstrap version and extract it in /wsgi/static/.
Step 4: create our pages
Flask-FlatPages works by scanning a directory named pages for files ending with the extension specified in the FLATPAGES_EXTENSION setting. Since we specified ".md", we can use the Markdown syntax to write our stuff.
$ cd ..
$ mkdir pages
$ cd pages
Now we can create a new page. Beware what you write in the filename, it will be reflected online in the url of the page.
my-first-page.md
title: My first page
date: 2012-08-01

Hi! This is my first page powered by [Flask](http://flask.pocoo.org/) and [OpenShift](https://openshift.redhat.com/).
Step 5: test it!
Point again your browser on http://127.0.0.1:8000 and you will see your new website in his splendor!
Step 6: deploy it
Nothing easier.
$ cd ../../
$ git add .
$ git commit -m "initial version of my new website"
$ git push origin master
If you did all correctly, you should see a lot of output and no errors. Point your browser at http://mysite-riccardoforina.rhcloud.com and have fun!
Conclusion
Well, now you have a working if not useful website. You can start customising it, adding features, writing stuff, whatever you like.
Have fun!